Attention Ladies: There might be a “wrong” time of the month to run and to hit heavy legs


Recent research reveals that women might face an increased risk of knee injury during the week prior to their menstrual cycles.
A study held at the University of Texas in Austin found an increased activity of nerves and muscle fibers surrounding the knee joint during this particular week and explained that such over-activity could potentially lead to instability of the knee joint and increased risk of knee ligament tears, especially Anterior Cruciate Ligament (ACL) tears and other pain in the front of the knees.
A member of this research study recommends taking it easy on legs and being careful while running during this specific week while focusing on strengthening the hip and thigh muscles during the “other 3 weeks.” This strategy may help to decrease the chance of premenstrual-related injuries, especially for women who engage in frequent bouts of running or running-related sports.
HOW TO PREVENT KNEE INJURIES
Need help building a leg routine to decrease your chance of injury? I already wrote one out for you! Below is an 8 week-long leg routine that will help tighten and tone your legs AND increase hip and knee stability. It is so low-impact that it can safely be performed during any week of your cycle!
CARDIO
- Do what ever cardio you want to during your free 3 weeks. During the week before your cycle, stop all long-distance cardiovascular exercise (especially running and spinning).
- During “that” week, perform 30 minutes minimum to 1 hour of cardio 3-5 days per week and use the following cardio machines at the designated intensity levels:
- Stairmaster: 40-70 steps per minute without holding on or with minimal holding on
- Treadmill: Incline of 7-10% and speed of 3 miles per hour without holding on or with minimal holding on
STRENGTH-TRAINING
- Perform the following exercises 2 days per week (preferably resting for 3 days in between each strength-training day). I have provided a 2-month training program (sets and reps). Add at least 5 lbs to each exercise from week 1 to week 4. If you decide to repeat the program for a second month, then add an additional 5lbs to the weight that you lifted during the same set and rep scheme the previous month. If you complete the designated number of reps and feel like you could comfortably do at least 2 more reps, then ADD 5 LBS to the weight being lifted.
Barbell Rear-Loaded Squat


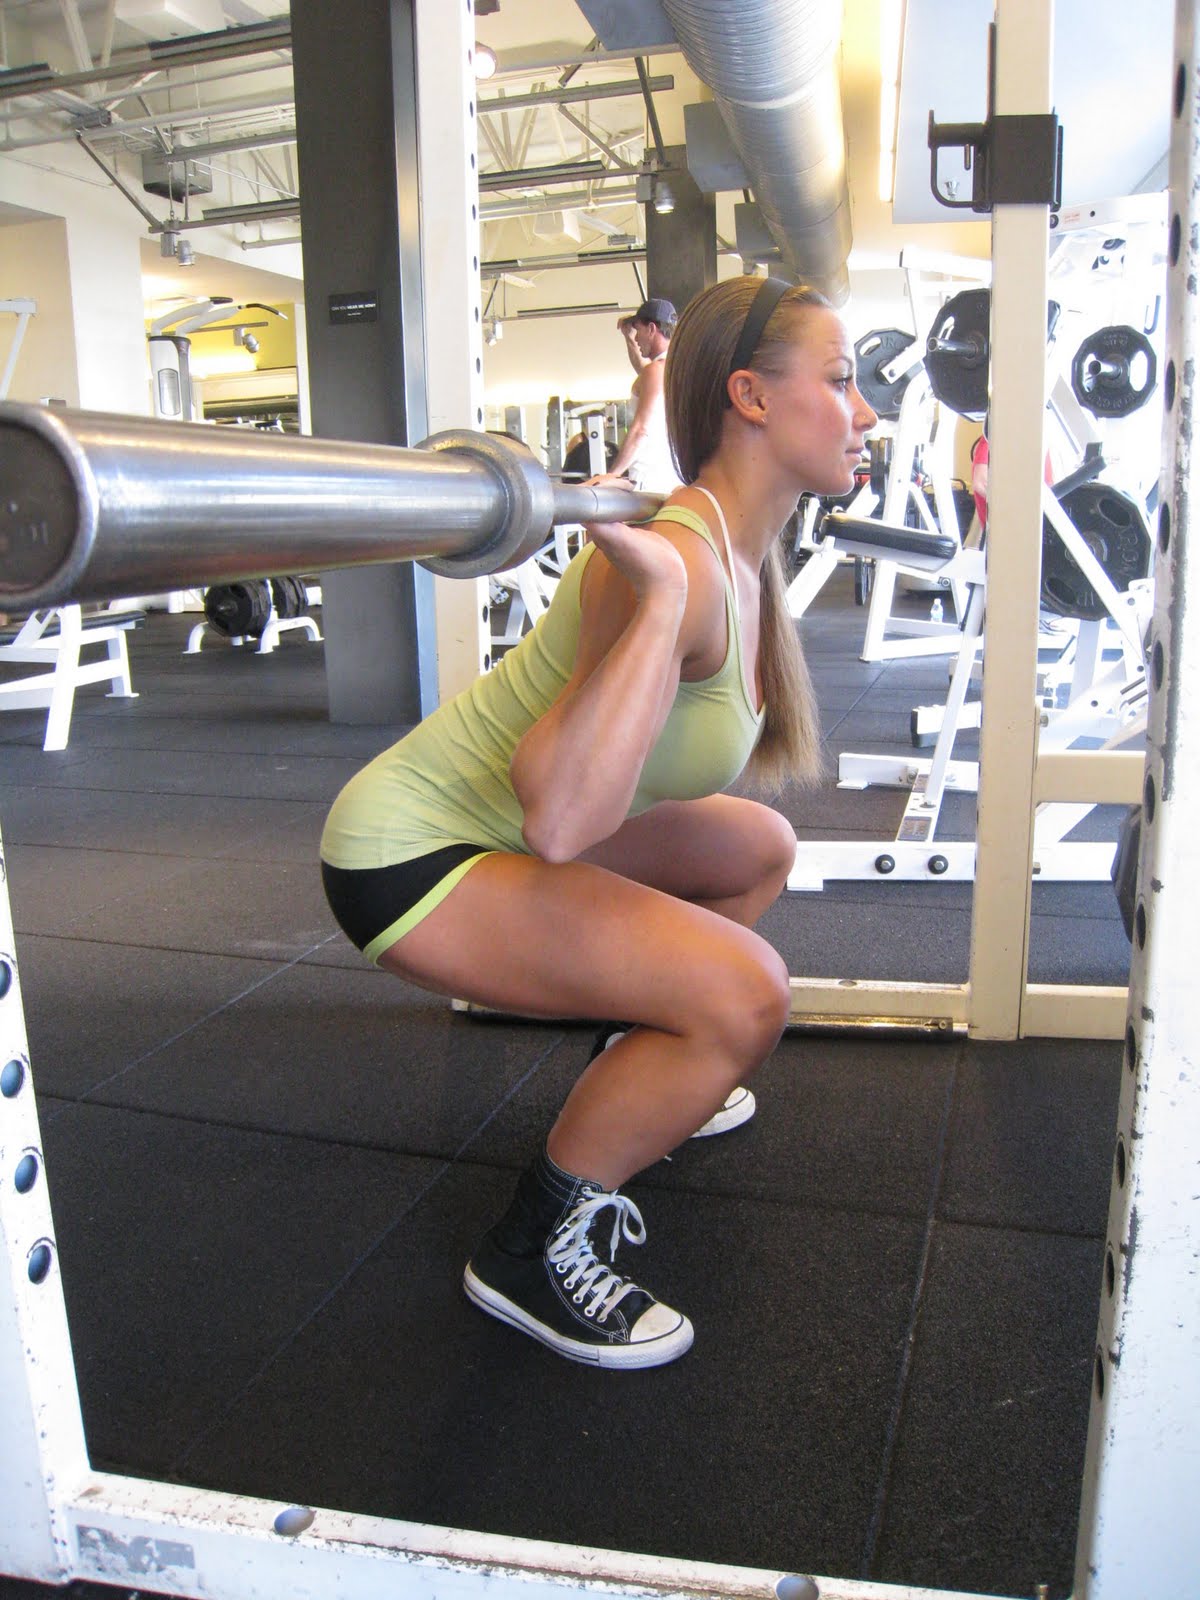
Set Up:
- Place the bar across the bottom of the rear-shoulders
- Use a hand-grip wider than shoulder –width
- Lift the elbows up to create a “shelf” for the bar using the upper back and shoulder muscles
- Hold the chest up and out
- Position the feet shoulder width apart or wider
- Point the toes slightly outward
Downward Movement:
- Allow the hips and knees to slowly flex until the thighs are parallel to the floor
- Maintain a position with the back flat, elbows high, and the chest up and out
- Keep the heels flat on the floor and the knees aligned behind or just over the toes
Upward Movement
- Explosively extend the Hips and knees at the same time
- Squeeze the gluts at the top of each rep
Week 1: 3×20 25lb+
Week 2: 3×15 3olb+
Week 3: 3×12 35lb+
Week 4: 3×10 40lb+
Barbell Romanian Dead-Lift

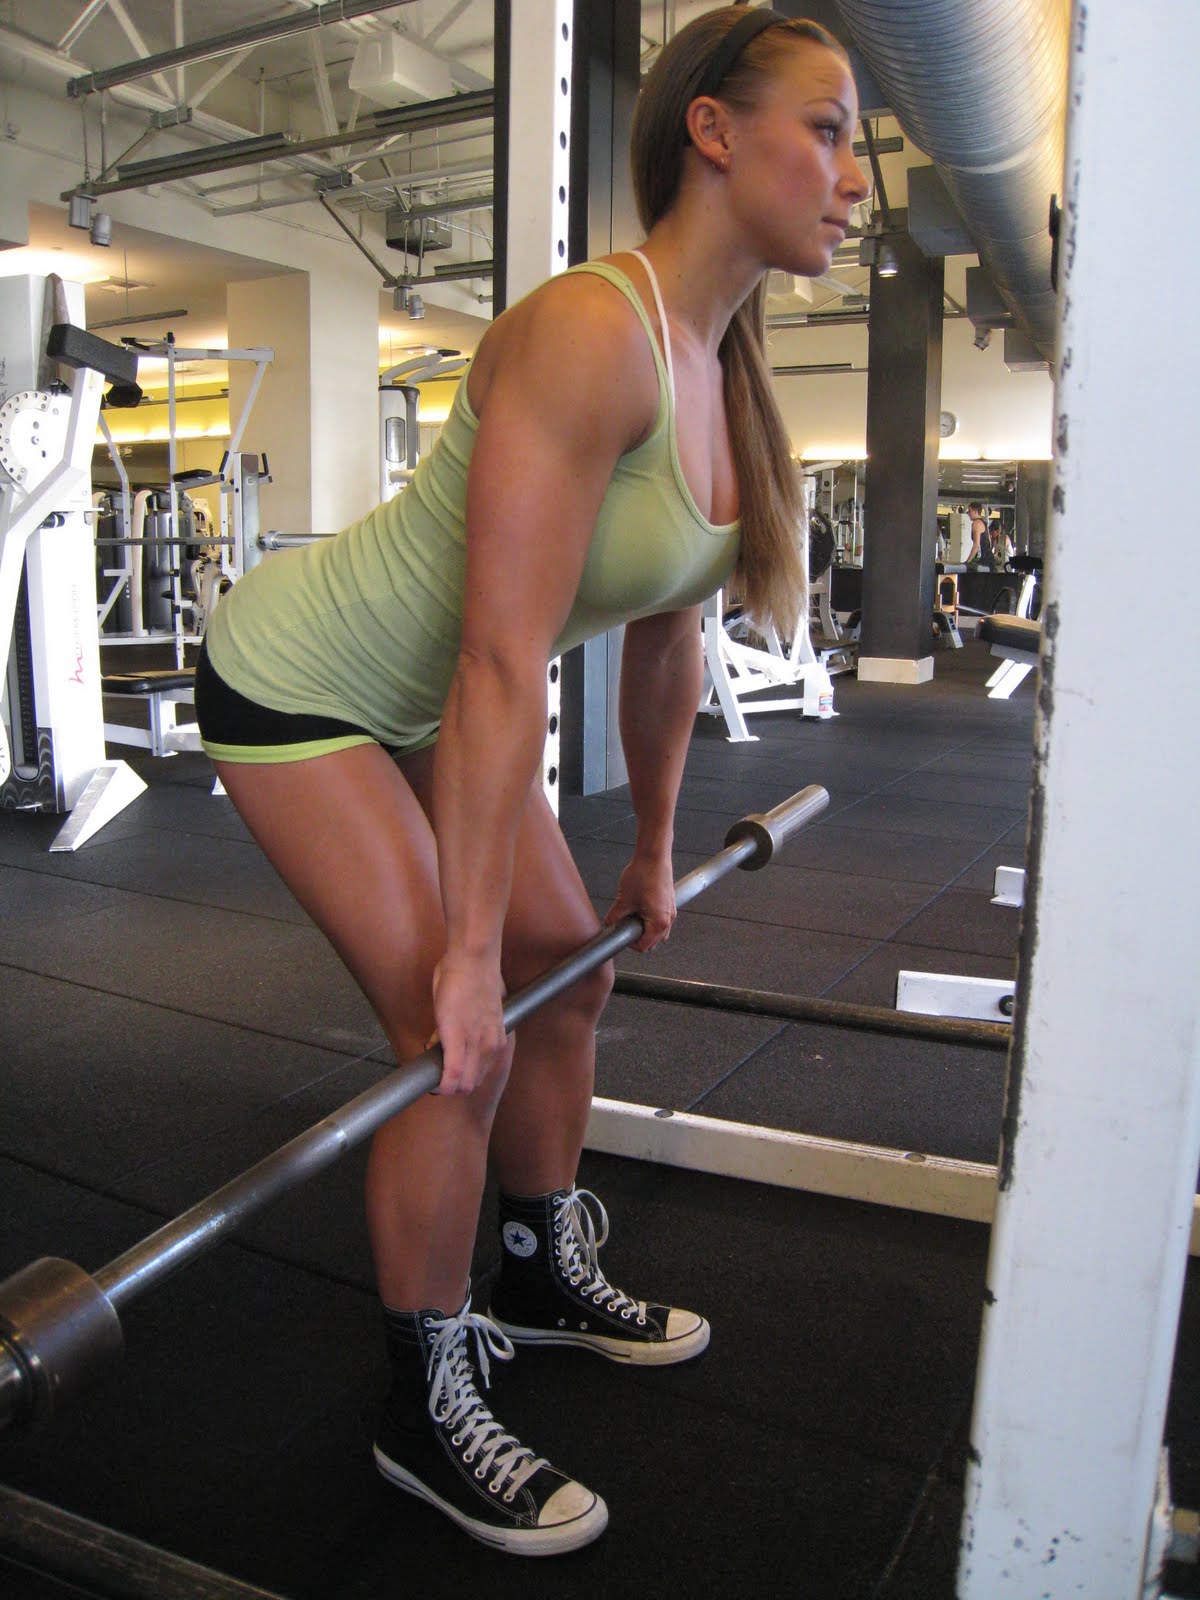

Set Up:
- Stand with the feet flat and placed between hip-and shoulder- width apart with toes pointed slightly outward
- Squat down with the hips lower than the shoulders and grasp the bar with hands slightly wider than shoulder-width apart, outside of the knees, with the elbows fully extended
- Position the bar in front of the shins
- Position the body with a flat back, relaxed traps, chest held up and out, heels on the floor, shoulders over or slightly in front of the bar, and eyes focused straight ahead or slightly upward.
Upward Movement:
- Lift the bar off of the rack by extending the hips and knees
- Do not let the hips rise before the shoulders. Keep them synchronized.
- Maintain a flat-back position
- Keep the elbows fully extended, the head neutral in relation to the vertebral column, and the shoulders over or slightly in front of the bar
- As the bar rises just above the knees, move the hips forward to move the thighs against the bar
- At full knee and hips extension, establish an erect body position
Downward Movement:
- Allow the hips and knees to flex while slowly lowering the bar to the middle of the shins. The goal is for your back to be parallel with the floor.
- Maintain the flat-back body position
Week 1: 3×20 25lb+
Week 2: 3×15 3olb+
Week 3: 3×12 35lb+
Week 4: 3×10 40lb+
Barbell Rear-Loaded Split Squat
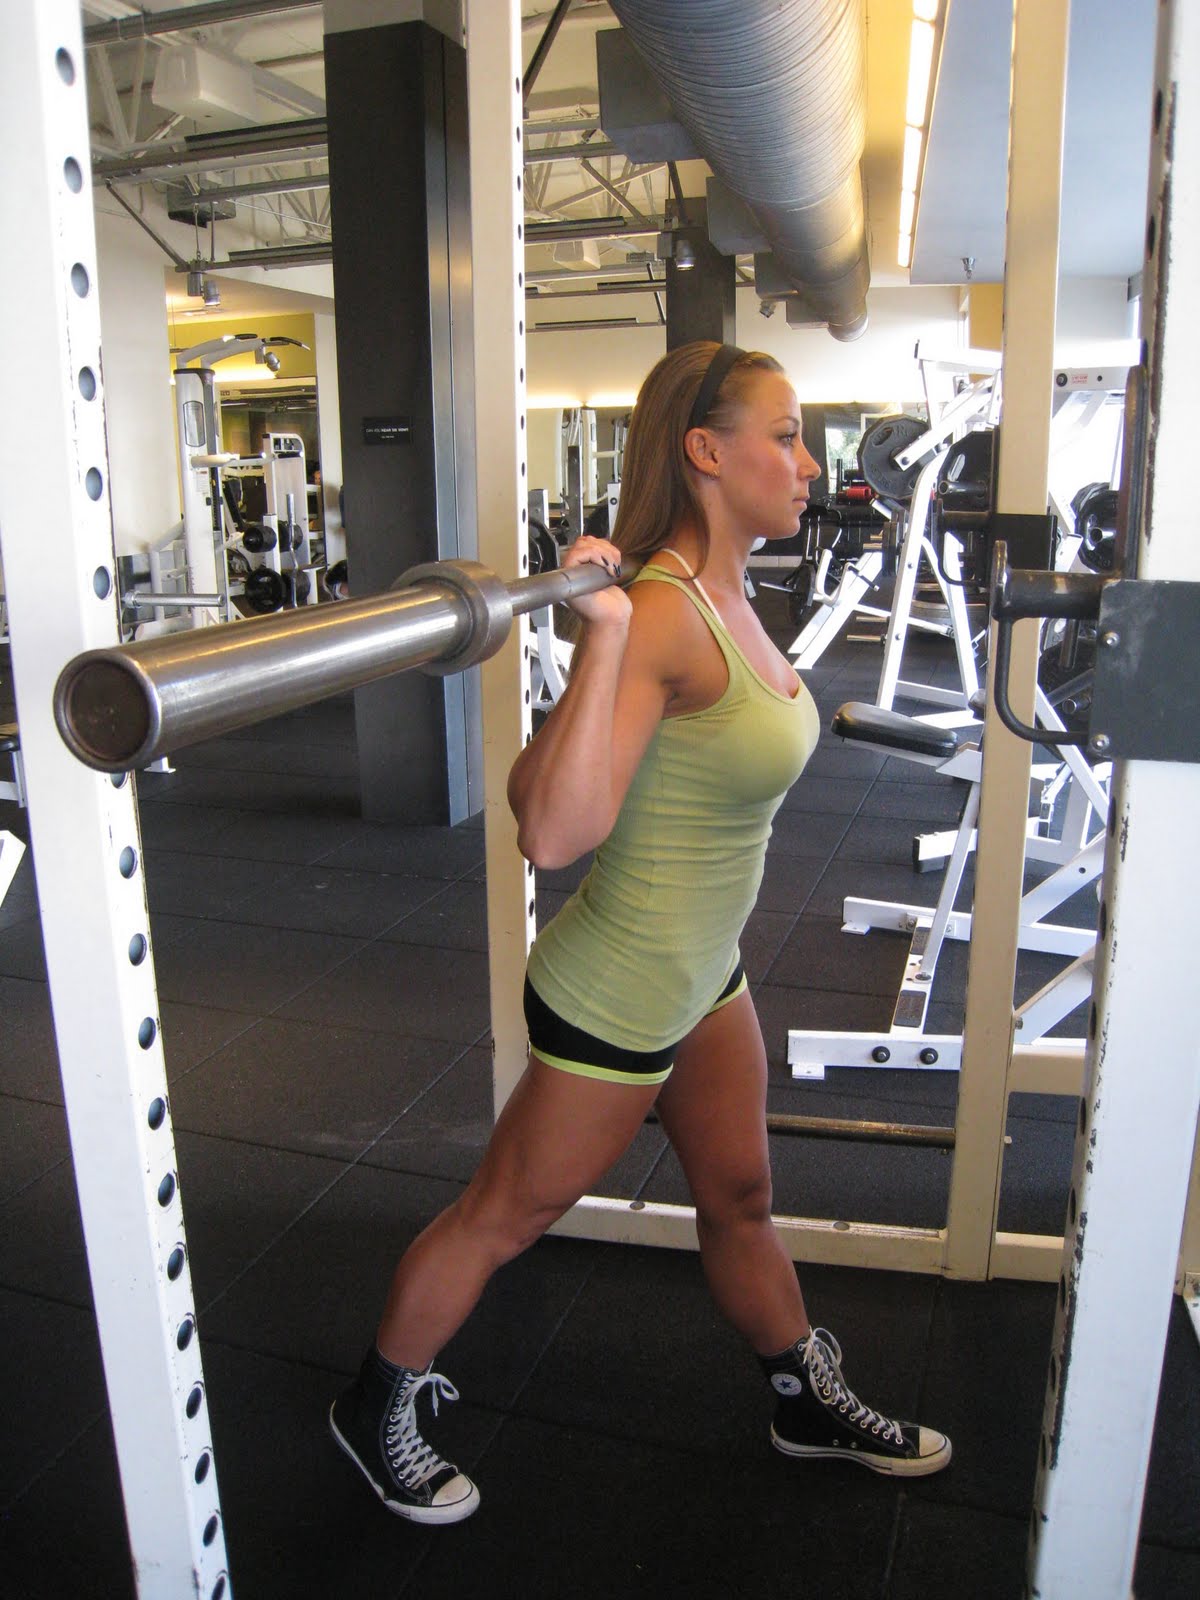

Set Up:
- Place the bar across the bottom of the rear-shoulders
- Use a hand grip wider than shoulder –width
- Lift the elbows up to create a “shelf” for the bar using the upper back and shoulder muscles
- Hold the chest up and out
- Position the feet parallel and take a large step forward with one leg
Downward Movement:
- Bent both knees, focusing on maintaining a 90 degree angle in each hip and knee
- Allow the rear knee to flex until it is 1-2 inches from the floor
- Keep the front knee directly over the lead foot. The front knee should never push past the front toes. If it does, then more the front food forward.
Upward Movement:
- Forcefully push off the floor with the front heel and rear toe, extending the hips and knees completely
- Once the set is complete, switch legs and repeat.
Week 1: 3×20 body-weight
Week 2: 3×15 9-12lb body-bar
Week 3: 3×12 12-15lb body-bar
Week 4: 3×10 15-20lb body-bar
Abduction Step Up


Set-Up
- Stand on the side of a 12-18 inch box so that the left leg is closest to the box
- Place the right foot flat on the front corner of the box so that the legs are crossed
- Position the hips straight ahead with both toes pointing forward
Upward Movement
- Using the right leg, step up onto the box
- Place the left foot on the farther front corner of the box
Downward movement
- Keep the hips forward and set the left leg back onto the ground with a bent knee
- Make sure that both toes are parallel when landing and hips are still straight
- Do not bounce off of the left leg to get onto the box
- Repeat for reps
- Once set is complete, move to the other side of the box and repeat, placing the left leg on the box
*weight held in outside hand*
Week 1: 3×20 bodyweight
Week 2: 3×15 10lb
Week 3: 3×12 15lb
Week 4: 3×10 lb
Cable Hip Abduction


Set Up:
- Position ankle straps so that the clip is on the inside of each ankle
- Make sure that Velcro is secure
- Face sideways from the cable tower
- Clip the cable to the inside of the ankle farthest from the machine
- Place body weight over the leg that is free of the cable attachment
- The supporting leg should be straight or minimally bent at the knee
Outward Movement:
- Stand in front of low pulley facing to one side
- Attach cable cuff to far ankle.
- Step out away from stack and grasp bar or cable tower
- Stand on near foot and allow far leg to cross in front
- Move cabled leg away from the body, laterally. Lead with the heel, not the toe
Inward Movement:
- Return and repeat
- Turn around and continue with opposite leg.
*weight varies depending upon cable system used. Start light and increase weight by 5 lbs per week*
Week 1: 3×20
Week 2: 3×15
Week 3: 3×12
Week 4: 3×10
Stay fit, Stay happy, Stay stable, and Stay strong!
And stay tuned for another blog regarding more ways to reduce the chances of knee injuries!
XOXO
-Lauren