Build a Booty!


Building a great butt is not easy. Regardless of how much fat you store on your fanny, cardio alone is NOT going to provide the definition you desire.
If you want a round rump, then lets’ start by getting a few things straight:
1) Cardio does not give you leg muscle.
- The main purpose of cardio is to train the heart, not your glutes, and definitely not your legs. Sure, cardio may slim down your stems and reduce the size of your bum. BUTT, If there is no muscle underneath that fat, then no matter how small your backside gets….there will always be fat.
2) You will never build muscle and tone-up without hitting the weights.
- I’m speaking to women only on this one: Contrary to popular belief, general weight-training will not make your legs bigger….in less you follow a body-building routine or you eat like a cow (in which case your diet is making you bigger, not the weights). However, weight-training any part of the body will cause temporary swelling of the muscle groups worked and may lead to a short-termed illusion of increased size.
- Rest assured that this swelling is only temporary and is usually caused by an increase in blood flow to the muscles utilized during exercise. Lactic acid is an end-product of lower-body exercise and can also contribute to this illusion of increased leg size. All swelling should decrease about 24-48 hours post weight-training and leg size should return to normal.
In order to achieve a superb shelf, proper nutrition and exercise-selection are critical:
PRE AND POST-EXERCISE NUTRITION
Pre-Workout
- On glute-training days, I recommend cutting all starch prior to weight-lifting; this means no cereal, grains, oatmeal, protein bars, rice, potatoes, etc. For example: if you plan to hit the gym before noon, then limit consumption to protein, fats, and fiber; stick with foods like eggs, meat, fat-free cottage cheese, fat-free yogurt, nuts, and veggie omelets. Have your last meal 1.5-2 hours pre-workout.
Post-Workout
- Immediately following your glute workout, consume 20-30 grams of a high sugar liquid carbohydrate followed by 25 grams of liquid protein. My favorite post-exercise recovery drink is half of a 32 oz “Gatorade Perform” beverage (orange flavored) mixed and shaken well with one serving of vanilla or chocolate whey protein powder. Your protein powder should contain close to 25 grams of protein per serving. This recovery beverage is high in electrolytes and tastes like an orange cream-sickle! All of my clients love it! Fast-digesting liquid carbohydrates enhance muscle recovery and decrease muscle soreness. When these fast digesting liquid carbohydrates are combined with fast-absorbing liquid protein, they act synergistically to increase protein synthesis and enhance muscle recovery.
CARDIO
- Stop all long-endurance cardiovascular exercise now! If you are currently running or fast-paced cycling, then you are literally working your butt-off! Prolonged endurance-based exercise is catabolic in nature; this means that muscle is used as an energy source and therefore lost during activity. Think about it; have you ever seen a long-distance marathon-runner with great glutes? These athletes are usually lean. However, muscle fullness, especially in the glutes, is lacking.
- My cardio prescription is to perform 30 minutes minimum to 1 hour of exercise 3-5 days per week and to use the following cardio machines at the designated intensity levels:
- Stairmaster: 40-70 steps per minute without holding on or with minimal holding on
- Treadmill: Incline of 7-10% and speed of 3+ miles per hour without holding on or with minimal holding on
- Treadill: Interval training. For example, a 2 minute walk at 3.5-4 mph followed by a 2 minute jog at 5.5-7mph
- Jump Rope: Intervals. For example, 1 minute of skipping followed by 1-2 minutes of rest (or strength-training)
STRENGTH-TRAINING
- Perform the following exercises 2 days per week (preferably resting for 3 days in between). I have provided a 2-month training program (sets,reps, and intensity). Add at least 5 lbs to each exercise every week from week 1 to week 4. If you decide to repeat the program for a second month, then add an additional 5lbs to the weight that you lifted during the same set and rep scheme the previous month. If you complete the designated number of reps and feel like you could comfortably do at least 2 more reps, then ADD 5 LBS to the weight being lifted.
Barbell Rear-Loaded Squat


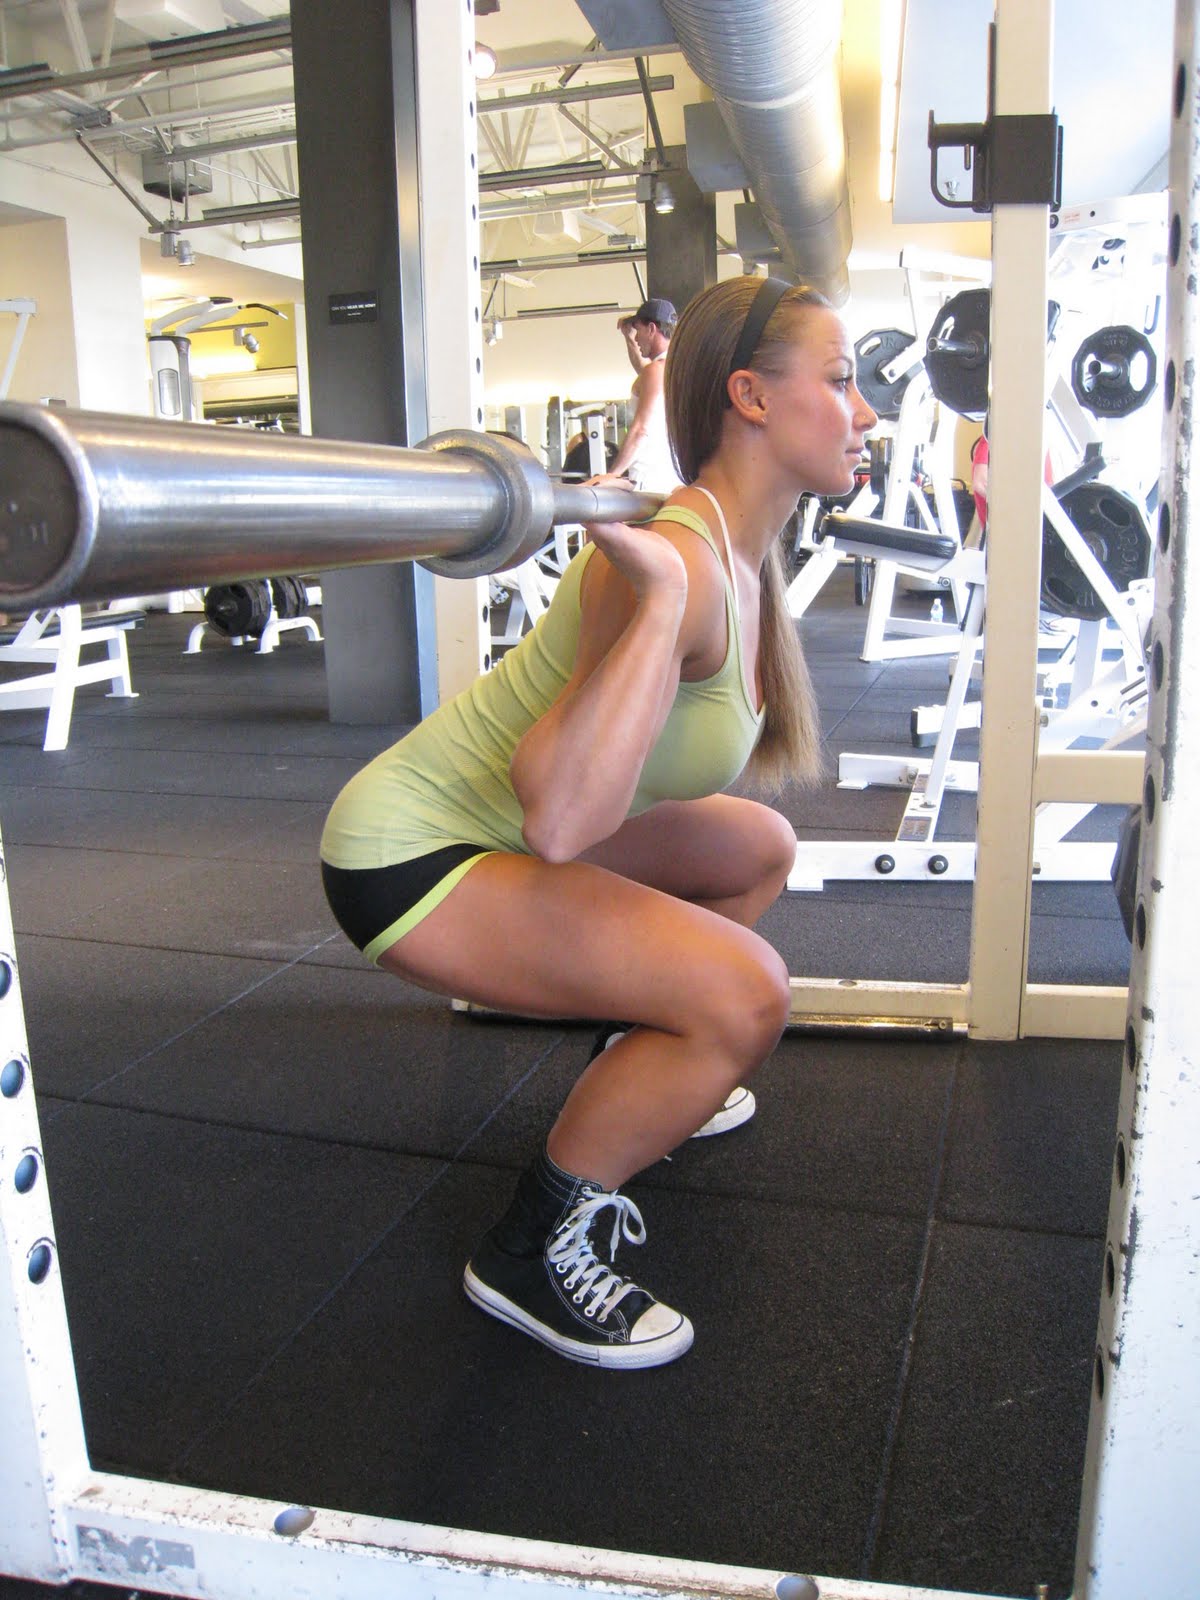
Set Up:
- Place the bar across the bottom of the rear-shoulders
- Use a hand-grip wider than shoulder –width
- Lift the elbows up to create a “shelf” for the bar using the upper back and shoulder muscles
- Hold the chest up and out
- Position the feet shoulder width apart or wider
- Point the toes slightly outward
Downward Movement:
- Allow the hips and knees to slowly flex until the thighs are parallel to the floor
- Maintain a position with the back flat, elbows high, and the chest up and out
- Keep the heels on the floor and the knees aligned over the feet
Upward Movement
- Extend the Hips and knees at the same time
Week 1: 3×15 35lb+
Week 2: 3×12 40lb+
Week 3: 4×10 45lb+
Week 4: 4×8 50lb+
Barbell Romanian Dead-Lift

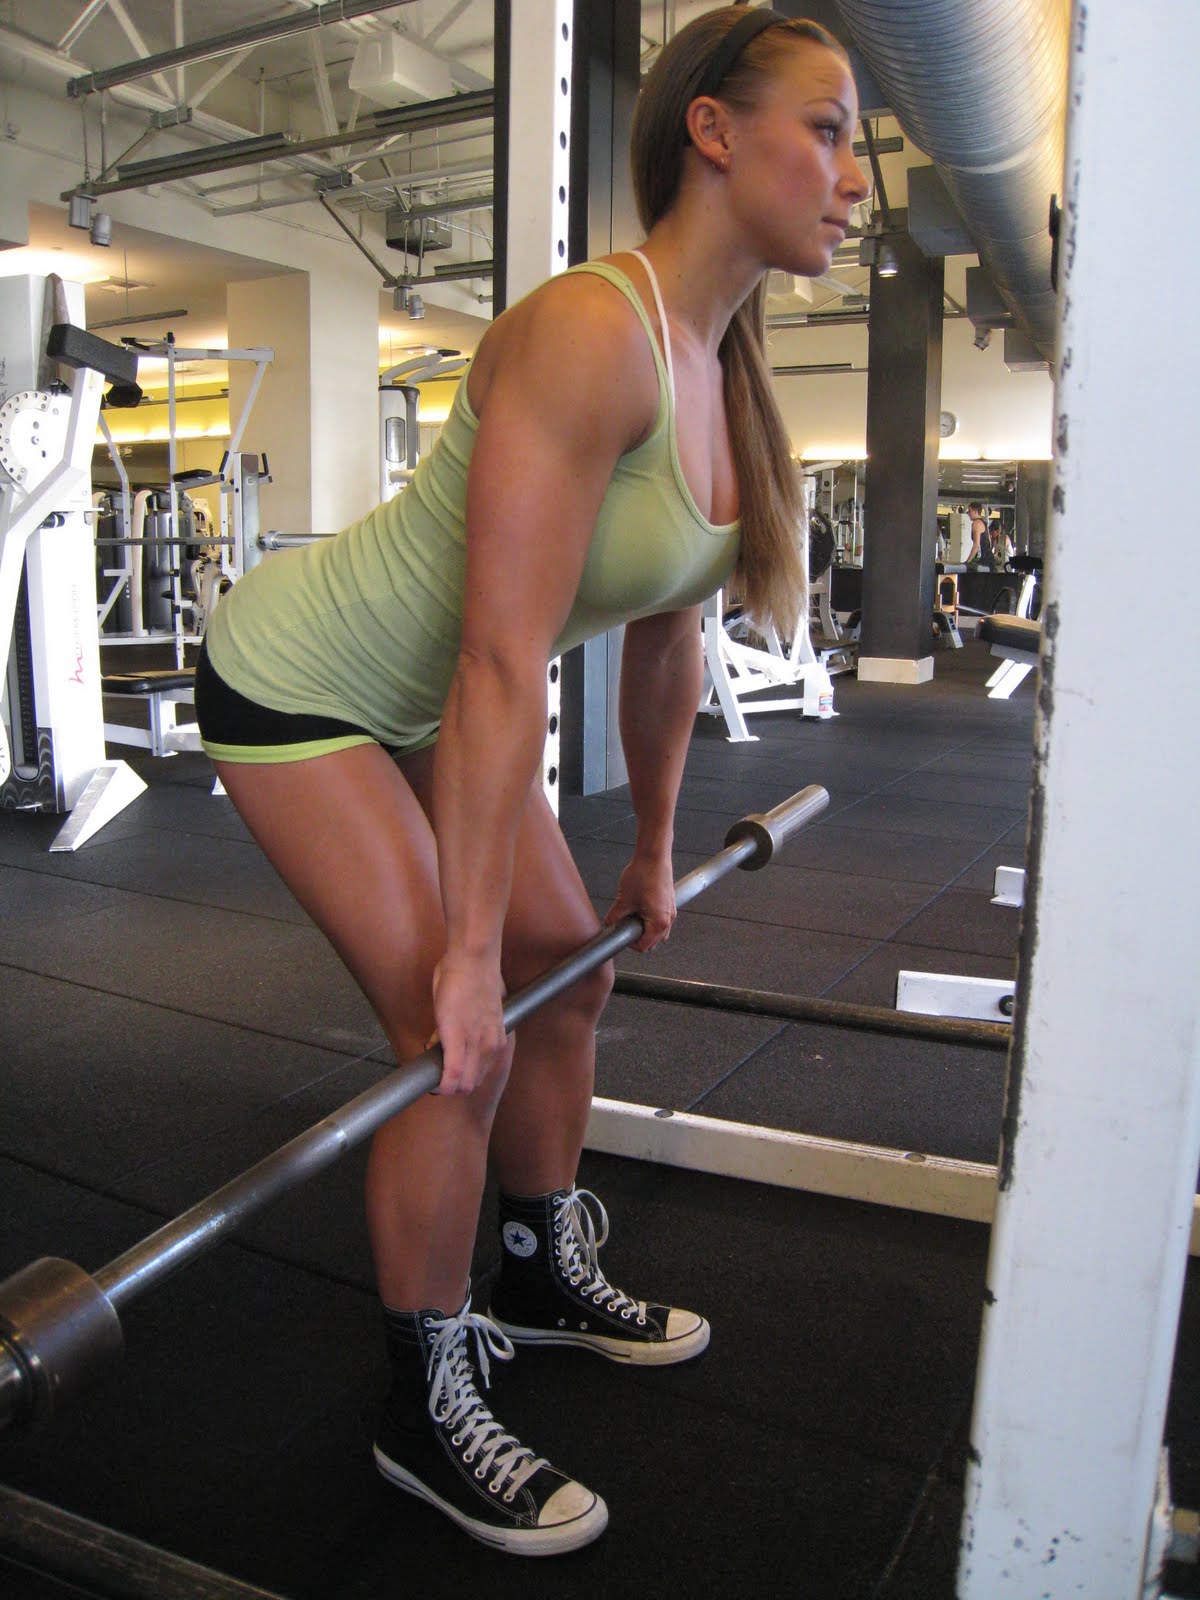

Set Up:
- Stand with the feet flat and placed between hip-and shoulder- width apart with toes pointed slightly outward
- Squat down with the hips lower than the shoulders and grasp the bar with hands slightly wider than shoulder-width apart, outside of the knees, with the elbows fully extended
- Position the bar 3-4 inches in front of the shins
- Position the body with a flat back, relaxed traps, chest held up and out, heels on the floor, shoulders over or slightly in front of the bar, and eyes focused straight ahead or slightly upward.
Upward Movement:
- Lift the bar off of the rack by extending the hips and knees
- Do not let the hips rise before the shoulders
- Maintain a flat-back position
- Keep the elbows fully extended, the head neutral in relation to the vertebral column, and the shoulders over or slightly in
- front of the bar
- As the bar rises just above the knees, move the hips forward to move the thighs against the knees under the bar
- At full knee and hips extension, establish an erect body position
Downward Movement:
- Allow the hips and knees to flex to slowly lower the bar to the floor
- Maintain the flat-back body position; do not flex the torso forward
Week 1: 3×15 35lb+
Week 2: 3×12 40lb+
Week 3: 4×10 45lb+
Week 4: 4×8 50lb+
Barbell Rear-Loaded Front Lunge
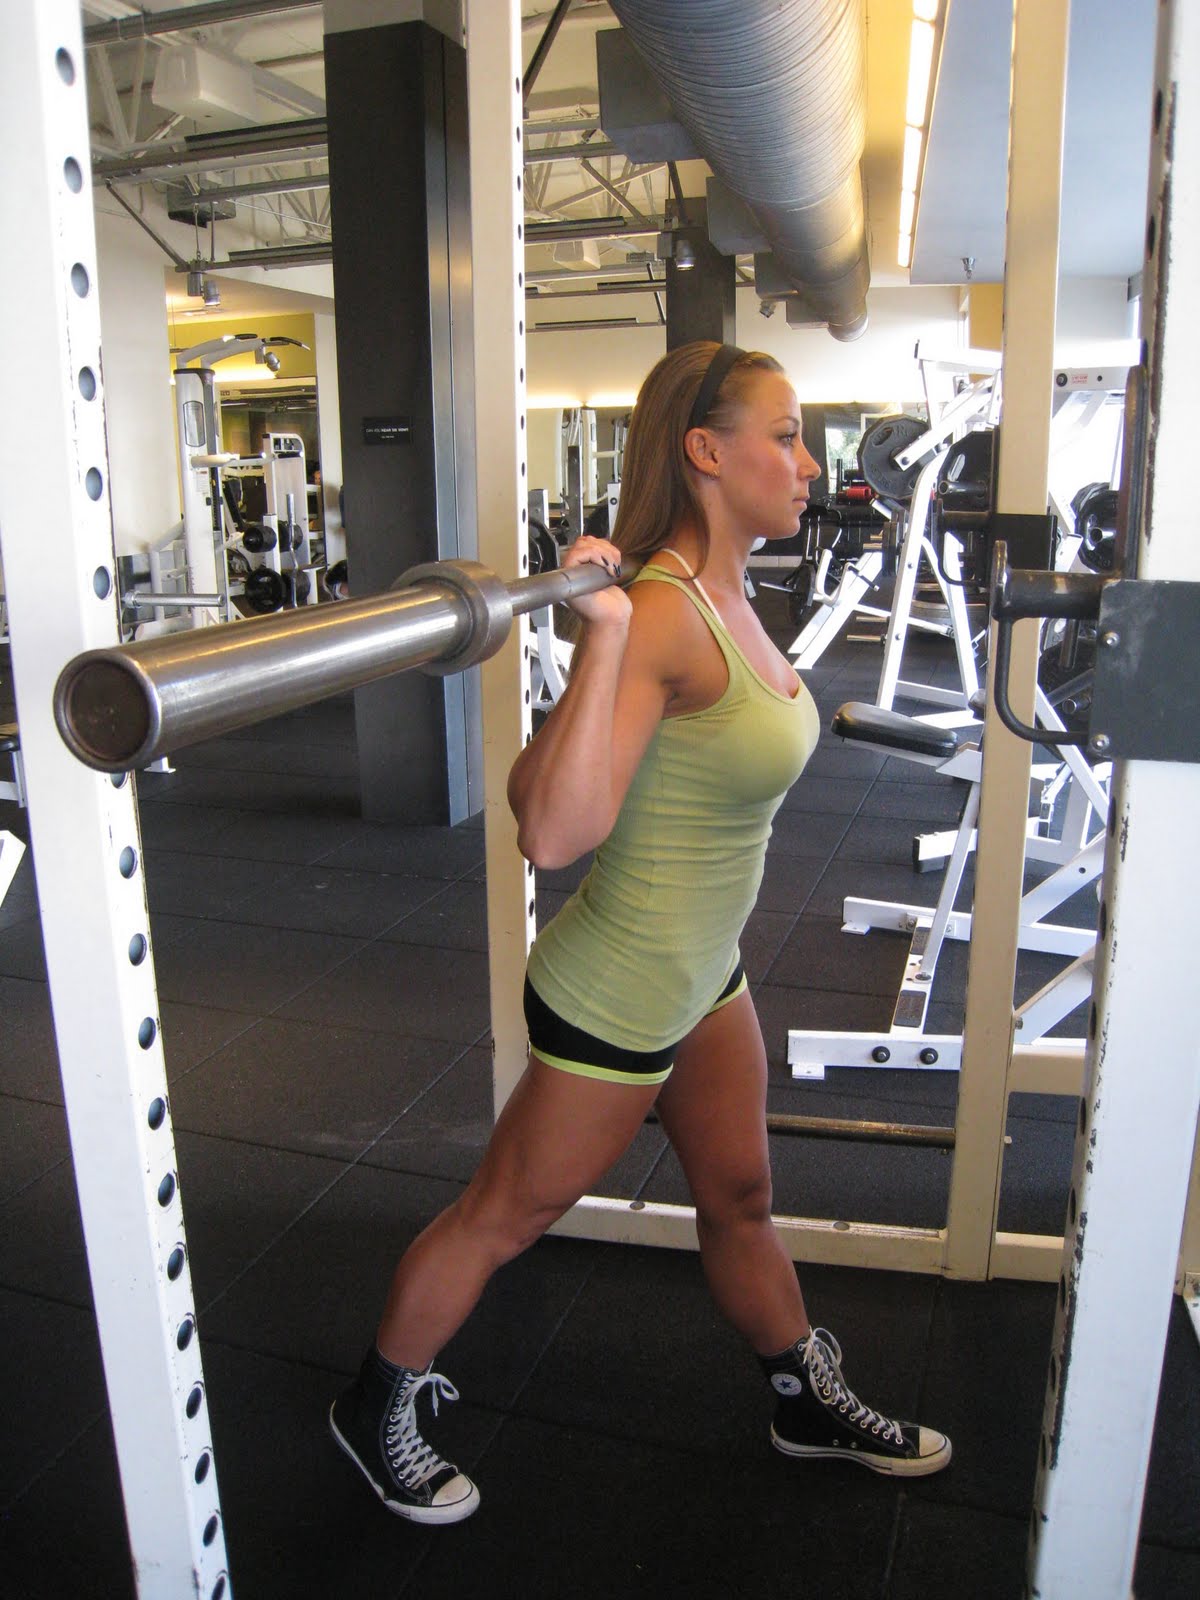

Set Up:
- Place the bar across the bottom of the rear-shoulders
- Use a hand grip wider than shoulder –width
- Lift the elbows up to create a “shelf” for the bar using the upper back and shoulder muscles
- Hold the chest up and out
- Position the feet together and parallel
- Point the toes straight ahead
Forward Movement:
- Take one exaggerated step directly forward with one leg
- Keep the torso erect as the lead leg moves forward and contacts the floor
- Allow the trailing knee to flex until it is 1-2 inches from the floor
- At the same time, allow the lead hip and knee to slowly flex
- Keep the lead knee directly over the lead foot
Backward Movement:
- Forcefully push off the floor with the front foot by extending the lead hip and knee
- Bring the lead foot back into position next to the trailing foot.
- Once the set is complete, switch legs and repeat.
Week 1: 3×15 body-weight+
Week 2: 3×12 20lb+
Week 3: 4×10 25lb+
Week 4: 4×8 30lb+
Abduction Step Up


Set-Up
- Stand on the side of a 12-18 inch box so that the left leg is closest to the box
- Place the right foot flat on the front corner of the box so that the legs are crossed
- Position the hips straight with both toes pointing straight ahead
- Upward Movement
- Using the right leg, step up onto the box
- Place the left foot on the farther front corner of the box
Downward movement
- Keep the hips forward and set the left leg back onto the ground
- Make sure that both toes are parallel when landing and hips are still straight
- Do not bounce off of the left leg to get onto the box
- Repeat for reps.
- Once set is complete, move to the other side of the box and repeat on using the left leg
*weight held in outside hand*
Week 1: 3×15 bodyweight
Week 2: 3×12 10lb
Week 3: 4×10 15lb
Week 4: 4×8 20 lb
Cable Hip Abduction


Set Up:
- Position ankle straps so that the clip is on the inside of each ankle
- Make sure that Velcro is secure
- Face sideways from the cable tower
- Clip the cable to the inside of the ankle farthest from the machine
- Place all weight on the leg that is free of the cable attachment
- The supporting leg should be straight or minimally bent at the knee
Outward Movement:
- Stand in front of low pulley facing to one side.
- Attach cable cuff to far ankle.
- Step out away from stack and grasp bar or cable tower
- Stand on near foot and allow far leg to cross in front.
- Move leg to opposite side of low pulley by abduction hip
Inward Movement:
- Return and repeat. Turn around and continue with opposite leg.
*weight varies depending upon cable system used. Start light and increase weight by 5 lbs per week*
Week 1: 3×15
Week 2: 3×12
Week 3: 4×10
Week 4: 4×8